Arduino Tutorial #6 – Scrolling LED
Arduino Tutorial #6 – Scrolling LED
This project will blink 6 LEDs, one at a time, in a back and
forth formation. This type of
circuit was made famous by the show
Knight Rider which featured a car with looping
LEDs.
Parts Needed
(1) Arduino Uno
(1) USB A-to-B Cable
(1) Breadboard – Half Size
(6) LED 5mm
(6) 220 Ω Resistor
(7) Jumper Wires
Before you can start working
with Arduino, you need to make sure you have the Arduino IDE software installed on your computer.
This program allows you to
write, view and upload the code to
your Arduino Uno board.
You can download the IDE for
free on
Arduino’s website.
Once the IDE is installed, you will need to
connect your Arduino to your computer.
To do this, plug one end of the USB cable to the Arduino Uno
and then the other end of the
USB to your computer’s USB port.
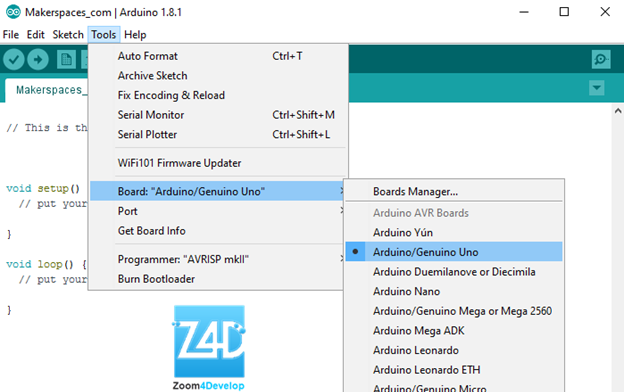
Select The Board
Once the board is
plugged in, you will need to open the IDE and click on Tools
> Board >
Arduino Uno to select the board.
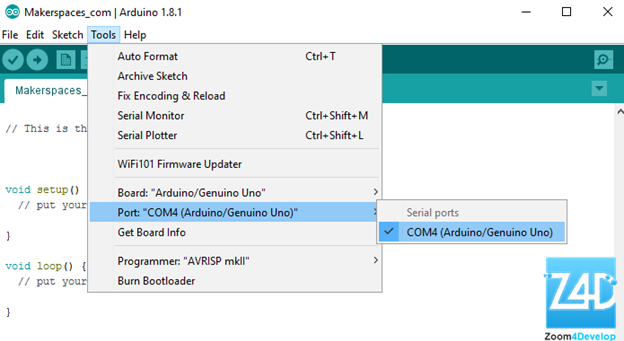
Select Serial Port
Next, you have to tell the Arduino which port you are using on
your computer.
To select the port, go to Tools > Port and then
select the port that says, Arduino.
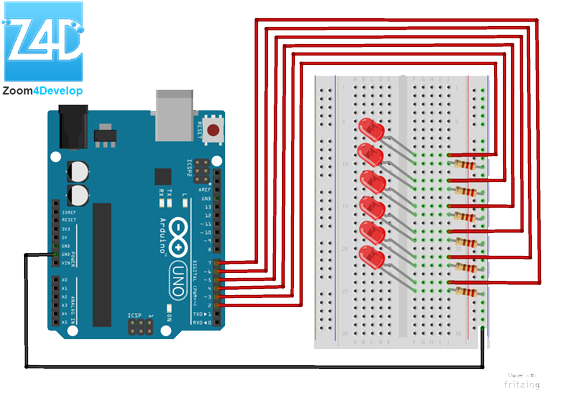
Project Diagram
Project Code
1. Connect the Arduino board to your computer using the USB
cable.
2. Open project code – Circuit_06_Scrolling
Use the link
below to download the zip folder containing the code.
Download Project Code
Once
the file has been downloaded, you will need to unzip/extract the folder in
order to use it.
3. Select the board and serial port as outlined in the earlier
section.
4. Click the upload button to send the sketch to Arduino.
from the sidebar icons
below Social icons on this page,
If you have a shortage
of the equipment used in this article, do not hesitate to buy it from one of my
private links there are good deals,(Amazon or Gearbest, or Aliexpress),
And do not worry,
there will be no extra cost, it will remain the same price,
Just please make sure
to add your product to site's
(shopping card ) if
you need some time before completing your purchase :)
Thank you for your good attention,
if you enjoy this tutorial please share this Page link on your social
account(s), and please join my social page(s) for more like this.


Join the conversation